(click on the pictures for a larger view)


| This describes how I installed a Kim Hotstart tank heater into my 1979 Case MB4/94. I'm an engineer (electrical and computer) but no gearhead, so I may not have made the best choices - use this info at your own risk! Having said that, the installation seems to work well. | |
| The heater I chose was a Kim Hotstart model TPS151GT10. This is a 1.5kW 120VAC small tank heater (about 7" tall by just over 4" across) that you plumb into the coolant system. It cost me about $60 from a truck supply place. I also used about 10 feet of 5/8" I.D. coolant hose, a few hose clamps and a 90 degree bend. | |
| This heater works via a thermosiphon - heated coolant is more buoyant, so it rises to the top of the engine and is replaced by cold coolant from the bottom of the engine - this sets up a circulation. In order for the thermosiphon to work properly, the connections to the engine must be made at the highest and lowest points. | |
| On the OM352 engine in my Mog, the engine coolant drain cock is the lowest point - I noticed that it had a hose barb on it. The hose barb was metric, but I thought a 5/8" hose would fit. The drain cock would have to be opened permanently, which presented a few issues, but it was the ideal place to connect the lower hose. | |
| The next issue was where to connect the upper hose. The cab heater connection on the thermostat housing seemed to be a good place and would take a 5/8" hose. On my Mog, which had been used in the desert, the cabin heater had been removed and the hose connection below the alternator had been hooked together with a short piece of hose. It was a pretty crummy job: the hose was kinked and was leaking slightly. I decided to cap off the lower hose, remove the hard line that ran down behind the belts, and directly connect the upper hose to the heater barb on the thermostat housing. With the heater still installed, some sort of tee would be required, mounted near the thermostat body. | |
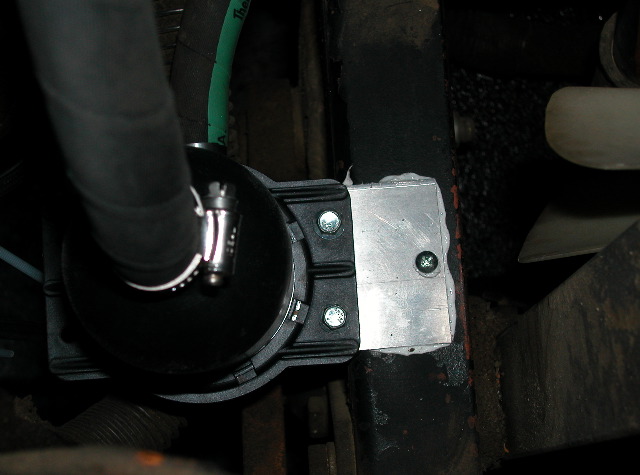
| The next thing to figure out was where to mount the heater itself - it needs to be below the lower connection on the engine for the thermosiphon to work properly. I found a good place on the passenger side of the radiator, on the frame rail. I fabricated a bracket from some 1/8" aluminum, drilled and tapped for a #10 machine screw and mounted the heater with some silicon glue and the screw. | |
|
|
Top view of the heater installed on the frame rail
(click on the pictures for a larger view) |
| I then ran the hose from the engine drain cock. It was very tight getting the hose and clamp on to the barb - I took off the mudflap/guard and turned the steering wheel all the way to the left to make room to work. After a few attempts (and a bit of cursing), I got it secured. | |
|
|
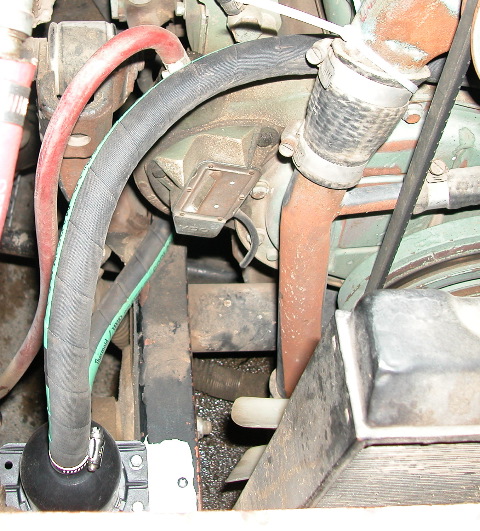
The connection to the engine drain cock |
| Now for the engine drain cock: I took out the valve body and wrapped it with 3 or four wraps of teflon plumbing tape - this allowed me to screw it back in halfway and have it stay there (it also sealed the threads). This isn't a permanent solution, since it could loosen under vibration. Options I'm considering include: (i) adding a bushing, so that I can get some preload on the threads, (ii) getting a bolt of the same size to replace the valve body, and (iii) cutting the end of the existing valve body. | |
| Update it's been over a year now and the teflon plumbing tape seems to work fine - the drain cock hasn't moved at all. So maybe it is a permanent solution (I'll continue to monitor it). | |
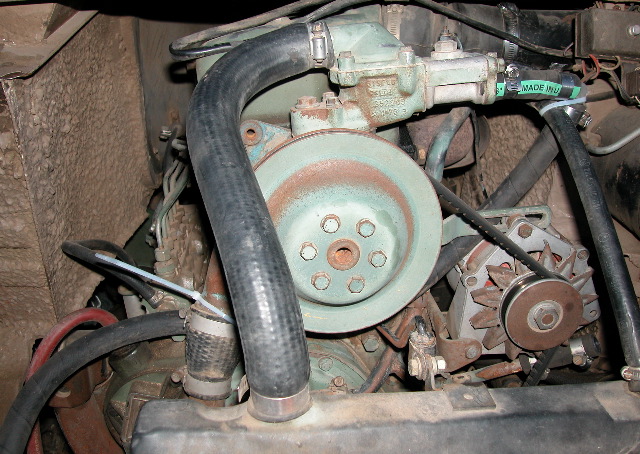
| The rest of the plumbing was straightforward. I used a 90 degree bend up next to the thermostat housing to make running the hoses easier. | |
|
|
Here you can see the connection to the thermostat housing, the 90 degree bend, and the hose running behind the belts and down toward the heater (off the bottom left of the pic). The hard line that I removed ran down the middle of the pic. You can just see the capped heater line below the alternator. |
|
|
This shows the upper hose running down to the heater |
|
|
Another view of the thermostat housing connection |
| Mog Page | Project Page |